Basics III: Scripting and Programming
Steven Luke
2026-01-02
Video Tutorial
What is a Script
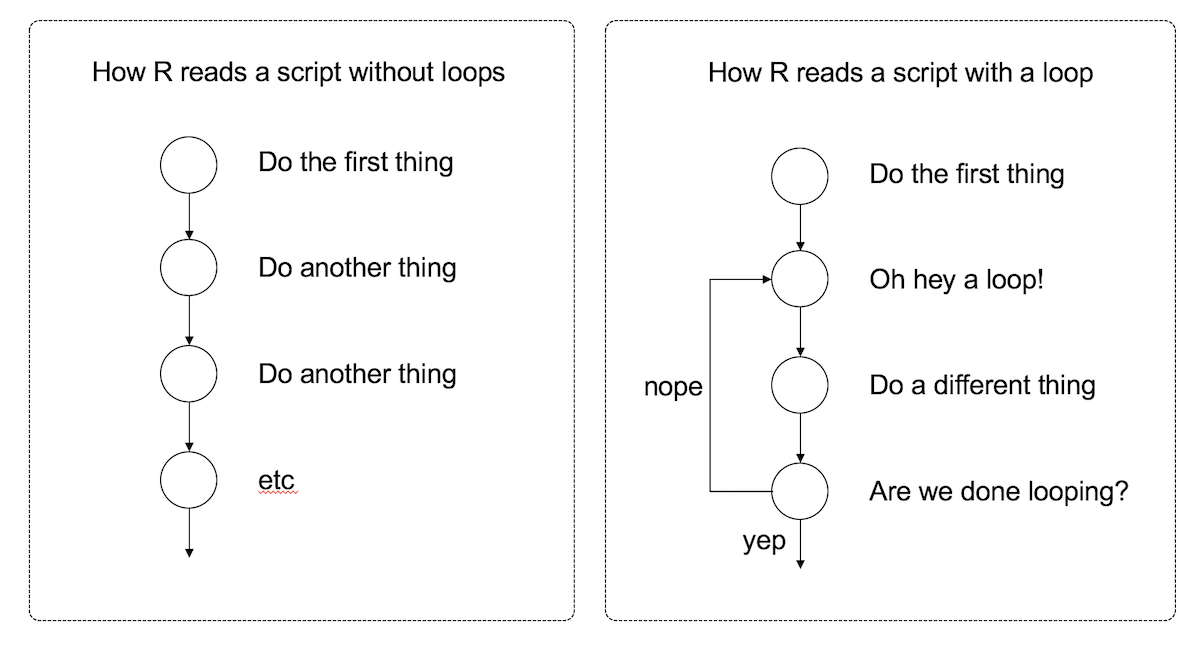
A script is a series of commands run in sequence. They build on each other to produce a desired outcome. Like this:

Before we get too far, let’s start by creating an R Notebook for you to practice with. Remember how this works? Check the previous unit on how to start a new Notebook. Be sure you do the following:
- Update/edit the header
- Create a setup chunk
- Create a new empty R code chunk
Good Programming Habits I: Comments
When making a script, be generous with comments describing your work. There are two ways to make comments
- Outside of Code: Write blocks of text before and/or after each chunk of code describing what the code does
- Inside of Code: Inside a code chunk, use the # to set off comments. Use these to describe the function of individual commands or as headers before smaller sections of code.
Ways to use comments
- Create headers for different sub-sections of a code chunk
- i.e. # The Code Below Does X
- Describe what a particular command is for
- i.e. print(“Hello World”) #Prints Hello World
- Show what the expected output of a command is
- i.e. 100 / 25 # 4
- Add a comment inside the empty code chunk
- Explain three uses for comments in code (i.e. what could your comments say?)
Variables
What is a variable? How would you define it?
Right! A variable is something that varies - it can take on different values.
In science, we measure variables, such as scores on a depression
inventory. This is a variable because the scores can be different from
person to person.
In programming we create a variable, and then assign it a value. A
variable is like a tupperware container where we can store something to
use later. It’s called a variable because it can hold different things -
the content can vary.

Types of Variables
There are 3 main types of variables:
- Numeric - Holds Numbers
- IntegerVariable <- 1
- RealNumberVariable <- 3.14159
- Text - Holds Letters
- FriendName <- “Tim”
- WhatFreudWantsToKnowAbout <- “Your Mother”
- Logical (AKA Boolean) - Holds True/False values
- Scriptures <- TRUE
- FriendsLie <- FALSE
The Assigner
Note the use of arrow symbol <- to ‘assign’ a value to a variable.
To make this, you can simply type < and -.
Don’t want to type that? Use the shortcut ALT + - instead,
Good Programming Habits 2: Variable Names
Rules for Naming Variables
- No spaces!
- Use _ (new_variable) or camel case (NewVariable)
- Only the following characters:
- ABCDEFGHIJKLMNOPQRSTUVWXYZabcdefghijklmnopqrstuvwxyz0123456789._
- Names are case sensitive:
- X and x are different variables
- Don’t/can’t use R function names as variable names
- Sometimes R will just not let you, other times you will regret it
How should you name your variables?
- Be informative
- Be brief
- This isn’t as big a deal with Rstudio’s autocomplete
- Be consistent
- Pick a style and stick with it
In the text part of your markdown document, do the following:
- Describe what a variable is.
- Describe the three types of variables in R.
- Try out both ways to create the ‘assigner’ <- that assigns a value to a variable
- Explain the do’s and don’t’s of variable naming.
In a new code chunk, do the following:
- Show how to work with numeric variables:
- Create a variable called ‘Number’ that has the value of 5.
- Use Number in a basic math equation
- Change the value of Number to 99
- Show how to work with string variables:
- Create a variable named FavoriteFood and save the name of your favorite food in it.
- Use the print command to print the FavoriteFood variable
- Show how to work with logical variables:
- Create the variable HavingFun. Give it a value of FALSE
- Change this value to TRUE
In a separate code chunk, do the following:
- Create a code chunk that solves this problem:
- Suppose that there are 6 students living in an apartment together. Each student goes grocery shopping separately and buys 3 gallons of milk. How many gallons of milk are there in the apartment? Don’t forget to use variables for Students and Milk!
Vectors
Definition
A variable stores a single value. A vector stores many! The different items in a vector are called elements.
Making a Vector
# Numeric Vector
MyFirstVector <- c(1, 2, 3, 4, 5)

# String Vector
DisneyPrinces <- c("Aladdin", "Hans", "Tarzan", "Captain America")
Note the c before the parentheses. To make a vector, put a list of elements in parentheses with a c in front.
- In text, explain the difference between a Vector and a Variable
In a code chunk or chunks, do the following:
- Show how to create a numeric vector called ShoeSizes with the following values: 9, 7, 9, 1, 4
- Show how to create a string vector called FavoriteFoods with the names of your 4 favorite foods
- Show how to create a logical vector called DoneYet with the following values: TRUE, TRUE, TRUE, TRUE, FALSE, TRUE
Working with Vectors
Examining & Naming Vectors
# How many elements in our vector?
length(MyFirstVector) # 5

# What kind of vector is it
class(DisneyPrinces) # "character" means string
typeof(MyFirstVector) # this is more specific.
# 'double' means a real number (i.e. 3.14159, 217, 0.43)

# Naming a vector's elements
names(DisneyPrinces) <- c("Aladdin", "Frozen", "Tarzan", "Avengers")
DisneyPrinces
names(MyFirstVector) <- c("Hamburger", "Hot Dog", "Fries", "Pizza", "Steak and Lobster")
Extracting Vector Elements
Extracting elements from a vector. Note the use of square brackets
# Extracting an element by number
MyFirstVector[1] # 1
MyFirstVector[4] # 4
DisneyPrinces[3] # Tarzan

# Extracting multiple elements by number
MyFirstVector[c(1,2)] #1 2
DisneyPrinces[c(4, 1)] # "Captain America" "Aladdin"
MyFirstVector[1:3] # 1 2 3
# 1:3 means 'from 1 to 3'. It's the same as c(1, 2, 3)
DisneyPrinces[3:1] # "Tarzan" "Hans" "Aladdin"
# 3:1 means 'from 3 to 1'. It's the same as c(3, 2, 1).

# Extracting an element from a named vector
DisneyPrinces["Avengers"] # Captain America
# Note the quotes around the name
Editing Vector Elements
# Replacing an element
MyFirstVector[1] <- 5 # 5 2 3 4 5
MyFirstVector[4] <- 99 #5 2 3 99 5

# Edit the vector in a pop-out window
edit(DisneyPrinces) # Not best practice
Doing Math with Numeric Vectors
#Let's start over with this
MyFirstVector <- c(1, 2, 3, 4, 5)

# A mathematical operation will apply to all elements in the vector
MyFirstVector + 5 # 6 7 8 9 10

# If one vector operates on another, the operation proceeds in order
MyFirstVector * MyFirstVector #1 4 9 16 25
# 1 * 1, 2 * 2, 3 * 3, etc.

# What if one vector is shorter than another?
MyFirstVector * c(2, 3, 4) # 2 6 12 8 15
Using Logic to Filter Vectors
keep <- c(TRUE, FALSE, TRUE, TRUE) # Create a logical vector
# Now use the logical vector to filter the string vector
DisneyPrinces[keep] #"Aladdin"         "Tarzan"          "Captain America"

# Create a logical vector that shows what values are greater than 3
expensive = MyFirstVector > 3 # Other comparators: > < >= <= == !=
expensive #FALSE FALSE FALSE TRUE TRUE
# Now filter
MyFirstVector[expensive]  #  4 5
Removing Elements from a Vector
Use minus signs to remove elements:
# Temporarily remove Tarzan
DisneyPrinces[-3] # "Aladdin" "Hans" "Captain America"

# Or use logic
DisneyPrinces[DisneyPrinces != "Tarzan"]
# the != neams NOT equal, so DisneyPrinces != "Tarzan" means
# Keep everything that is not tarzan

# To make this change permanent, we have to re-assign the vector to itself:
DisneyPrinces <- DisneyPrinces[-3]  # Makes this change permanent
In a code chunk(s), do the following:
- Show how to get the length of ShoeSizes
- Show how to find out what kind of vector FavoriteFoods is
- Show how to give names to the elements of DoneYet
- Show how to print the 3rd entry in your FavoriteFoods vector
- Show how to change the last entry in your FavoriteFoods vector to “Sauerkraut”
- Show how to add 2 to all the numbers in your ShoeSizes vector
- Show how to filter your ShoeSizes vector to only show numbers greater than 5
Loops
What is a loop?
A loop is block of code (i.e., a sequence of commands) that R will execute over and over again until some termination criterion is met
When do you think we would want a loop?
When we need to do the same thing repeatedly, we use a loop
There are 2 kinds of loops:
- While loops
- For loops (these are my favorite, and the kind I use the most)

While Loops
While_Variable <- 0 #You need some kind of variable that will signal when to exit the loop
#And you usually want to (re)set this value just before the loop starts
while(While_Variable < 1000) {
#Some kind of comparator that produces a logical (T/F) value
    print(While_Variable)
    While_Variable <- While_Variable + 1 #What does this do?
#What would happen if we didn’t have it (or something like it)?
} # Notice the curly brackets enclosing the code to be repeated
while ( CONDITION ) {
STATEMENT1
STATEMENT2
ETC
}For Loops
for(For_Variable in 1:1000) { #Some kind of vector that determines how long the loop will run
# Code inside brackets will be repeated, like the line below:
    print(For_Variable)
}

#Instead of 1:1000, we could use any vector
words <- c("it", "was", "the", "dirty", "end", "of", "winter")
for(this_word in words) {
  n_letters <- nchar(this_word) #what does this do?
  block_word <- toupper(this_word) #and this?
  cat(block_word, "has", n_letters, "letters\n") #What about this?
}
for ( VAR in VECTOR ) {
STATEMENT1
STATEMENT2
ETC
}Good Programming Habits III: Loops
When should you use a While Loop vs a For Loop?
While
You don’t know how long you’ll need the loop to run for
For
You know exactly how long the loop should run (or R does)
Avoid Infinite Loops!
If you’re not careful, you can make a loop that keeps going forever, with no termination condition. This is bad. Which kind of loop is more likely to do this?
Loops are slow
Try and avoid them if you can (without just repeating code) Instead, use vectorized code: apply a function to the entire vector at once, instead of one element at a time (e.g. nchar(words) creates a new vector with the lengths of all words in the “words” vector, no loop required)
In text, do the following:
- Explain what a loop is and when you would use it
- Explain the difference between For and While loops>
- Explain what an ‘infinite loop’ is. Why is this bad? Which kind of loop is more likely to do this?
- Even if a loop is working properly, it has a big downside. What is it?
In separate code chunks, do the following:
- Write a While loop that searches through the vector DoneYet until it finds the value FALSE
- Write a For Loop that goes through FavoriteFoods and prints
something like this:
- My number 1 favorite food is Steak
- My number 2 favorite food is Spaghetti
- My number 3 favorite food is Ice Cream
- My number 4 favorite food is Sauerkraut Hint Remember the paste command? That can work with variables as well as text.
Branches (AKA Conditional Statements AKA If-Then Statements)
A branch statement executes a set of code only if certain conditions are met. This allows your code to make choices – treating different data values differently.
There are two kinds of branches:
- If statements
- If-else statements

Conditional
Before we jump further into branches like monkeys, we need to know about conditional statements. A conditional statement is a short sentence that can be true or false. Every branch has a conditional statement -if the statement is true, the code in the branch will run. If the conditional statement is false, the code in the branch will not run.
Here are some examples of conditional statements, which can be true or false:
- The sky is blue.
- Pluto is not a planet.
- Lebron James is taller than a baby.
- Humans have fewer legs than a dog.
Logical Variables
The simplest branch we can use is a logical variable that has a TRUE of FALSE value. Like these:
CONDITIONAL_VARIABLE <- TRUE
THIS_VARIABLE_IS_FALSE <- FALSE
But more often, we will set of a condition by comparing two things in some way. Here are some examples.
Equal ==
To see if two things are equal, we use a double equal sign == The code below compares the string “John” to whatever is in the variable NAME_VARIABLE and returns TRUE if they ARE THE SAME. Will it return TRUE or FALSE?
SKY_VARIABLE <- "Blue"
# The sky is blue
SKY_VARIABLE == "Blue"
Not Equal !=
To see if two things are not equal, we use exclamantion equal != The code below compares the string “John” to whatever is in the variable NAME_VARIABLE, and returns TRUE if they are NOT THE SAME. Will it return TRUE or FALSE?
PLUTO_VARIABLE <- "Not a Planet"
# Pluto is not a planet
PLUTO_VARIABLE != "Planet"
Greater Than and Less Than (> and <)
Greater than and less than compares one number to another. If the one on the open side of the ‘greater than’ sign (remember, the alligator wants to eat the bigger number), the statement is true.
Lebron_Height <- 81 # inches
Average_Baby_Height <- 20 # inches
# Lebron height is greater than baby height
Lebron_Height > Average_Baby_Height
Greater than or equal to/Less than or equal to (>= and <=)
We can also make ‘greater than or equal to’ or ‘less than or equal to’ by adding an equal sign after then greater than/less than sign, like so:
Human_Legs <- 2 # inches
Dog_Legs <- 4 # inches
# Humans legs are less than or equal to dog legs
Human_Legs <= Dog_Legs
AND & and OR |
We can link multiple conditional statements together into a ‘super-conditional’ using AND and OR, like this:
- The sky is blue AND Pluto is not a planet.
- Lebron James is taller than a baby OR Humans have fewer legs than humans.
An AND statement is only true if BOTH parts of the statement are true. If one is false, the whole statement is false. An AND is represented by an ampersand &. An OR statement is true if even one of the statements are true. If one is true, the whole statement is true. An OR is represented by a vertical bar |.
Here is an AND statement in R code:
# The sky is blue AND Pluto is not a planet.
SKY_VARIABLE == "Blue" & PLUTO_VARIABLE != "Planet"
# Lebron James is taller than a baby OR Humans have fewer legs than humans.
Lebron_Height > Average_Baby_Height | Human_Legs <= Dog_Legs- Create two variables: TimAge and JimAge and give them numeric values of your choice
- Show how to compare two variables to see if:
- TimAge equals JimAge
- TimAge does NOT equal JimAge
- TimAge is greater than JimAge
- TimAge is less than or equal to JimAge
- TimAge AND JimAge are greater than 18
- TimAge OR JimAge is greater than 18
IF
Now that we know about conditional statements, let’s see how branches use conditionals to selectively run code. We’ll start with the simplest branch, the if branch.
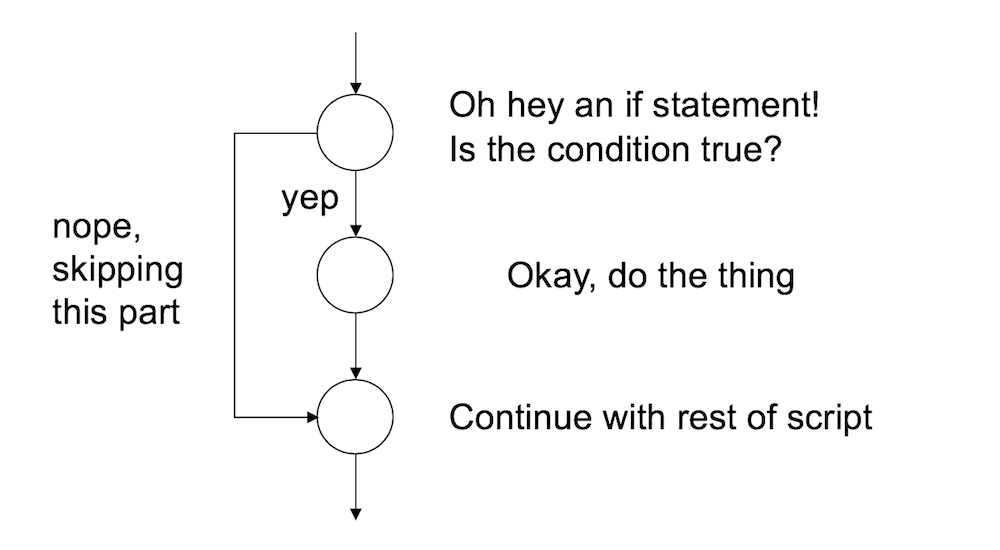
An if branch runs the statements inside the brackets if the condition is true. Otherwise it does nothing. It looks like this.
if ( CONDITION ) {
  #CODE THAT WILL RUN IF CONDITION IS TRUE
}
For example, for the if below, if the variable COVID is TRUE, R will print “Stay home!” If COVID is FALSE, or anything besides TRUE, R skips the print command.
if (COVID) {
    print("Stay home!")
}
IF ELSE
An if-else branch has code that runs if the conditional is true, as well as different code that runs if the statement is false. Like this:
if ( CONDITION ) {
  #CODE THAT WILL RUN IF CONDITION IS TRUE
} else {
  #CODE THAT WILL RUN IF CONDITION IS FALSE
}

if (COVID) {
    print("Stay home!")
} else {
    print("No Worries!")
}- Describe what a branch does in a script.
- In a code chunk, do the following:
- Create a variable called ‘Day’ that has the value Saturday
- Create a branch that does the following:
- if Day is equal to Saturday or Sunday, print “It’s the Weekend!”
- Otherwise, print “Meh.”
Put it all together to Generate a Dungeons and Dragons Character!
Dungeons and Dragons characters have 6 ‘stats’: “Strength”, “Dexterity”, “Constitution”, “Intelligence”, “Wisdom”, and “Charisma”. Each stat determined by doing the following:
- First, roll 4 six-sided dice.
- Drop the smallest number.
- Add up the other numbers.
We’re going to use variables, vectors, and loops to make a character. Do the following:
- Start by creating a vector called ‘CharacterStats’. It should have 6 zeroes in it to start.
- Generate 4 random integers between 1 and 6 (i.e. roll a dice 4 times)
- sample(1:6, 4, replace = TRUE)
- Input these 4 random integers into a vector called ‘Rolls’
- Sort Rolls from highest to lowest
- sort(Rolls, decreasing = TRUE)
- Drop the lowest number from the vector
- Rolls[-4]
- Sum the remaining numbers in Rolls and input this sum as the first element in CharacterStats
- Repeat steps 33-37 six times using a for loop, so that you have 6 different numbers in CharacterStats
- Be sure to put the first number as the first element in CharacterStats, the second number as the second, and so on. Don’t just overwrite the first number over and over again.
- Why should step 32 NOT be inside the loop? What would happen if it were?
- Name the elements in CharacterStats as follows: “Strength”, “Dexterity”, “Constitution”, “Intelligence”, “Wisdom”, and “Charisma”
- Print the stats that you have generated with their associated names
Functions (Optional)
What is a function? (Hint - we’ve seen LOTS of these already).
Right! A function is an R command that does something.
- print()
- mean()
- cat()
- and so on
Did you know that you can make your own functions in R?
When might you want to? I suggest that you make your own function when you are using a set of code repeatedly in your script and you want to make things simpler and easier to remember.
FNAME <- function( ARG1, ARG2, ETC ) {
    STATEMENT1
    STATEMENT2
    ETC
    return( VALUE )
}
Things to keep in mind when making a function:
- What are the arguments? (remember what arguments are?)
- Should we create any default arguments?
- What will the output be?
Example Function
# give the function a name - fahrenheit_to_celsius
fahrenheit_to_celsius <- function(temp_F) {
  # call "function" and give the argument variable a name - temp_F
  # Do the math, creating a new variable temp_C
  temp_C <- (temp_F - 32) * 5 / 9
  # return temp_C as the output
  return(temp_C)
}- (Bonus) Turn this code into a function that you can call whenever you want to make another character. The function should return a vector of stats
- (Bonus) Modify your function to take a ‘class’ argument (e.g. “Fighter”, “Wizard”, “Thief”). Use a branch statement to assign the stats depending on what class the user wants to play (e.g. fighters should have high strength, wizards high intelligence, thief high dexterity)
- (Bonus) Further modify your function to take an additional ‘cutoff’ argument. If this argument is non-zero, re-roll stats that are below this cutoff.